On to.....Portraits
Now that we have captured three dimensional space on a two dimensional surface, let's move to the challenge of a more organic form: The portrait.
This sometimes daunting task is going to be broken down for you in a variety of ways. The first step we will take in this class toward portrait completion is the GRIDDED PORTRAIT. It is my hope that you will find this method somewhat mind easing as it breaks the bigger picture down into segments….literally.
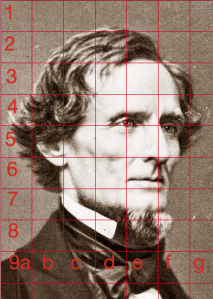
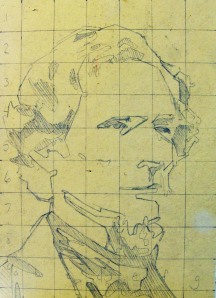
The basic gridded portrait is simply this: You take an image of a person and put a grid over top of it. A typical grid is 1 inch by one inch. On a blank sheet of paper, you repeat that exact same grid in terms of number of squares. You can increase or decrease the size of the squares to size up or size down the drawing, so long as the grid stays proportionately the same. From there, you use the grid to break a larger image down into segments such that, as you look at the photograph you transfer the drawing over square by square, line by line, ensuring the whole image makes sense, yet not being overwhelmed by the entire, intimidating face.
This sometimes daunting task is going to be broken down for you in a variety of ways. The first step we will take in this class toward portrait completion is the GRIDDED PORTRAIT. It is my hope that you will find this method somewhat mind easing as it breaks the bigger picture down into segments….literally.
The basic gridded portrait is simply this: You take an image of a person and put a grid over top of it. A typical grid is 1 inch by one inch. On a blank sheet of paper, you repeat that exact same grid in terms of number of squares. You can increase or decrease the size of the squares to size up or size down the drawing, so long as the grid stays proportionately the same. From there, you use the grid to break a larger image down into segments such that, as you look at the photograph you transfer the drawing over square by square, line by line, ensuring the whole image makes sense, yet not being overwhelmed by the entire, intimidating face.
Once you get the basics down and you feel comfortable with your PROPORTIONS and general layout, begin layering in value and details until POOF….a magically well drawn portrait appears.
Please also remember the tips given in class for noses, eyes, lips and hair. Use line when its time to use line, use value when its time to use value, and eliminate some of the needless details in order to CONVEY what it is you truly SEE, not what you think you see.
Warm-up Portrait Assignment
1. Pick a celebrity with the grid overlay.
2. Create a 1" x 1" grid on an 8" x 11" paper (use a ruler to create straight and parallel lines).
3. Begin sketching one grid space at a time by referencing the grided celebrity. Focusing on one square at a time helps you to concentrate on a small section of your drawing, and to slowly but steadily draw the entire picture.
4. Layer in value (similar to hallway drawing start with your darkest darks and work your way into your lightest lights, use of H and B pencils are required with blending tool).
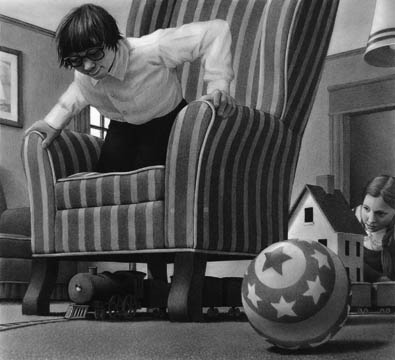
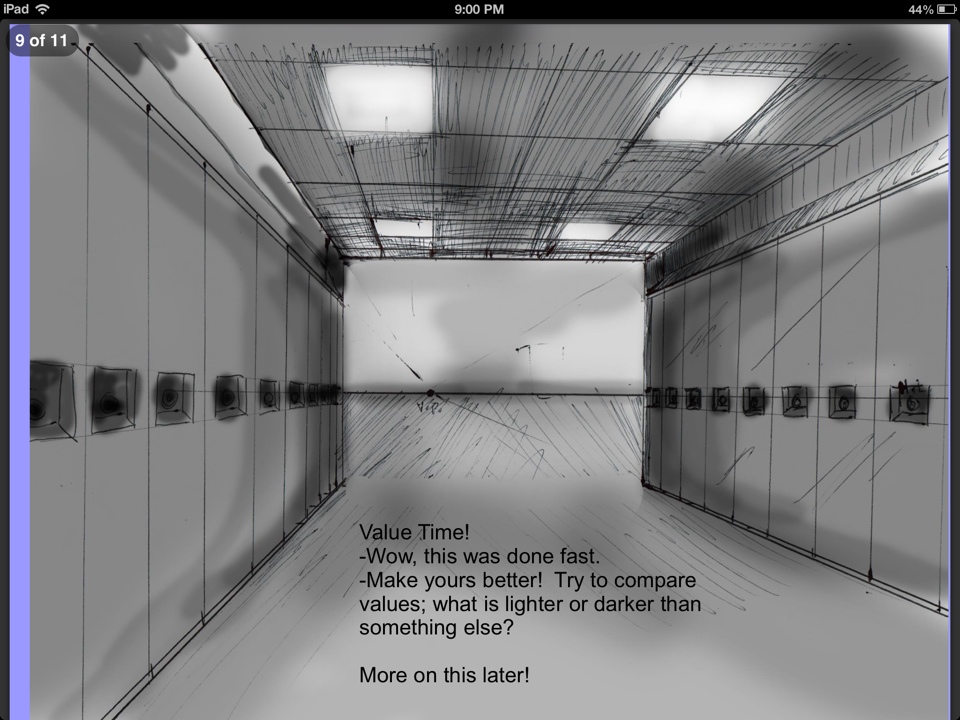
Value
Value: val·you(noun) – An element of art, value refers to the lightness or darkness of a color. Value becomes critical in a work which has no colors other than black, white and a gray scale. For a great example of value in action, think of a black and white photograph. You can easily visualize how the infinite variations of gray suggest planes and textures. In order to add to any composition and push that sense of dimension and realism, you MUST start to consider value.
Value is a term synonymous with shading in this class and it will quickly become an element of art we dive into headfirst. Understanding the pencils provided and their consequent codings, as well as application of value and tools that will assist in that process will help you tremendously.
Here we go:
pencils coded with B mean a soft lead. 2b, 4b, 6b etc. The higher the number preceding the b, the softer the lead. The softer the lead, the darker the value the pencil will apply. Please use B pencils to add richness and deep contrast to your images.
pencils coded with H mean a hard lead. 2h 4h 6h etc. The higher the number preceeding the h, the harder the lead. The harder the lead, the lighter the value the pencil will apply. Please use H pencils for roughing in layouts/sketches, as well as for the values that should be lightest in your drawings.
Mixing the pencil types used and beginning to define forms with value instead of outlines will be a big step into making your drawings realistically accurate. Contrast between values will be key!
CHECK OUT THIS SITE FOR TIPS:
http://drawsketch.about.com/od/learntodraw/ss/pencilshading.htm
Check out works by Chris Van Allsburg- Illustrator of Jumanji and The Polar Express
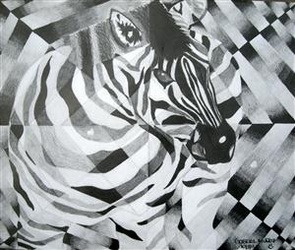
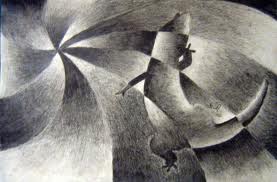
Shattered Drawing
1: Select a subject and produce a contour line drawing. Choose a single object such as a car, insect, person’s face, fish, etc. Subject could be taken from an online photo.
2: Figure out a way to break up/divide your image in a linear way before value is added. Some examples are: shattered glass, waves of water, spiral of a seashell, or geometrical division of shapes such as squares or triangles. These new lines will overlap the drawing of your subject. This will make your initial line drawing more visually complicated. The effect is to create many more shapes, like a giant puzzle.
3: Experiment with filling the shapes in your image with a range of black to grey. Look at each shape and decide which area should start with the richest black and which should be the lightest gray.
4: Fill the entire paper with values including both the positive shapes and the negative background shapes.
5: Consider each space a new shape in which to apply value, switch value application with each space and line that you cross.

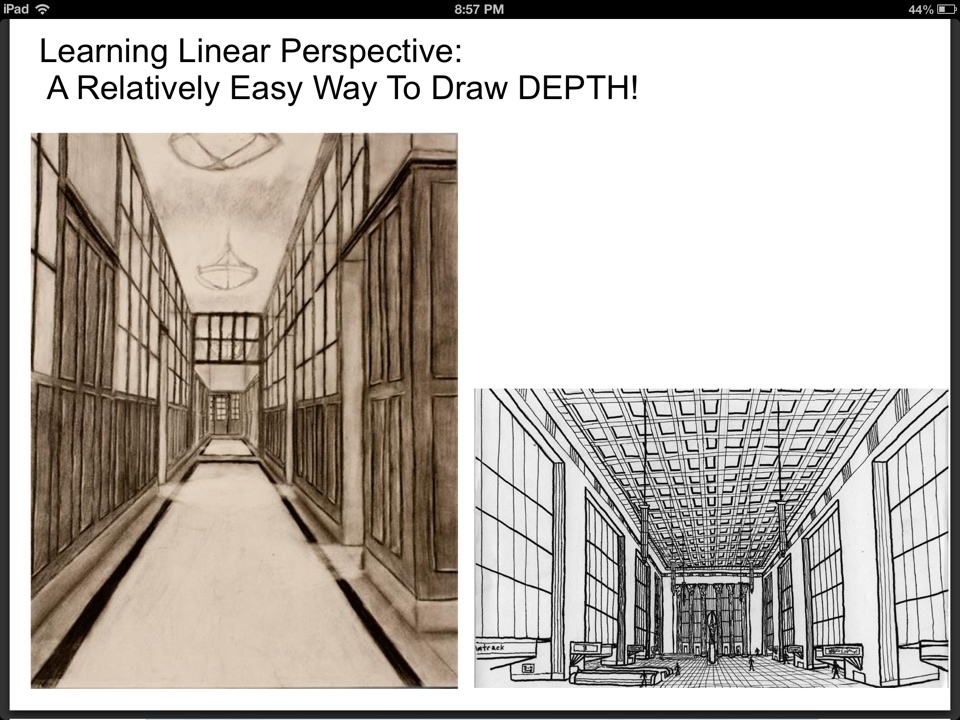
Lets get some perspective!
What is it and who discovered it?
Linear Perspective is a geometric method of representing on paper the way that objects appear to get smaller and closer together, the further away they are.The invention of linear perspective is generally attributed to the Florentine architect Brunelleschi,
What is it and who discovered it?
Linear Perspective is a geometric method of representing on paper the way that objects appear to get smaller and closer together, the further away they are.The invention of linear perspective is generally attributed to the Florentine architect Brunelleschi,


and the ideas continued to be developed and used by Renaissance artists, notably Piero Della Francesca and Andrea Mantegna.
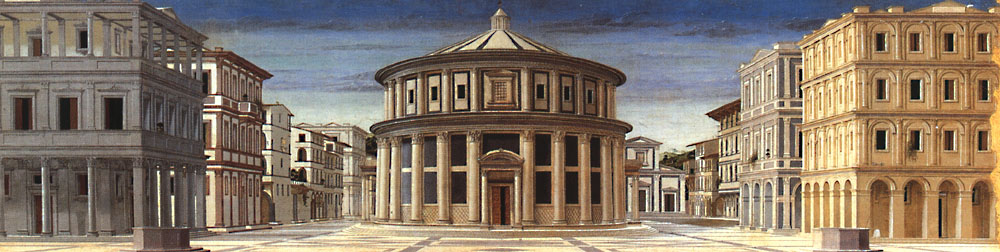
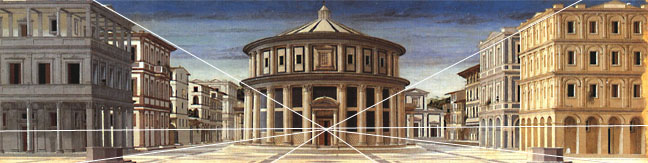
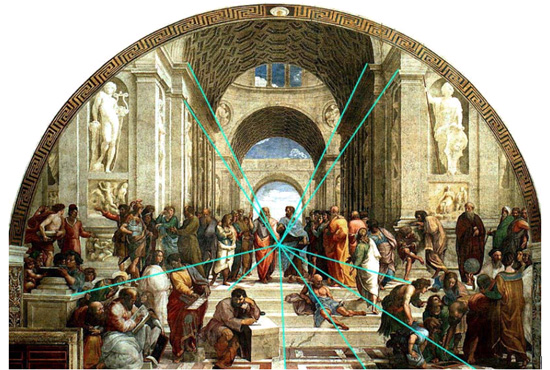

Until Brunelleschi, drawings attempted to convey depth, but did so in an oddly ineffective way. In our class, we will start off with our own observations of linear perspective as we explore vanishing points through simple/complex shapes.
Voacabulary terms I EXPECT you to know and use:
Voacabulary terms I EXPECT you to know and use:
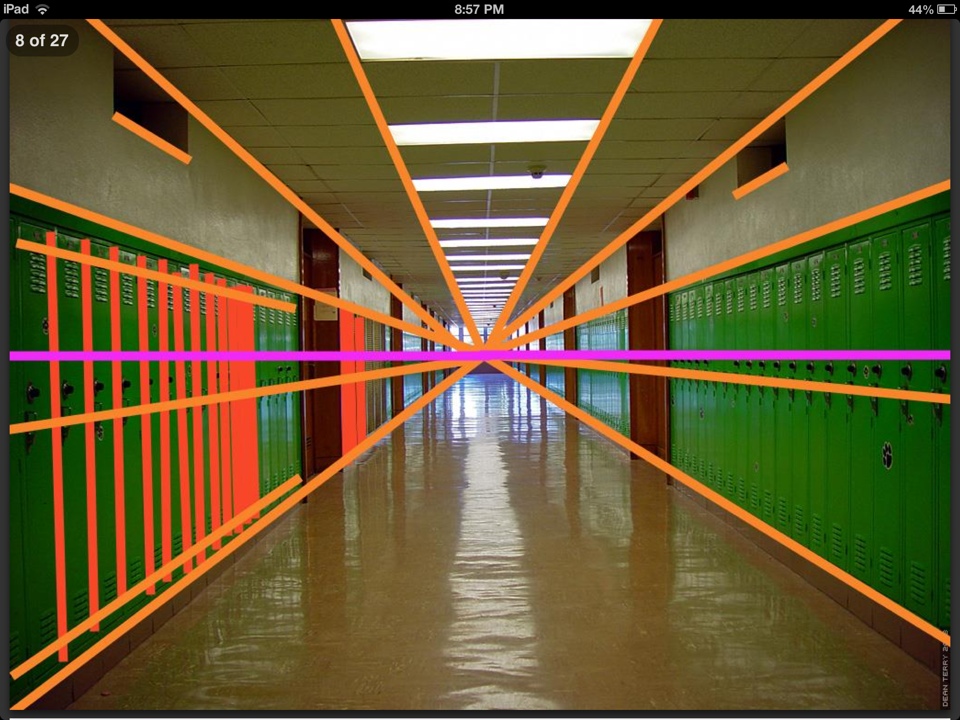
- linear perspective: a mathematical system for creating the illusion of space and distance on a flat surface ( 1 point, 2 point and multiple points possible)
- vanishing point: the point to which parallel lines appear to converge in the rendering of perspective, usually on the horizon
- converging lines: two parallel lines that will converge at some point as they recede away from the viewer. The point of convergence forms the vanishing point.
- orthogonal lines: essentially interchangeable with converging lines
- vertical lines
- value
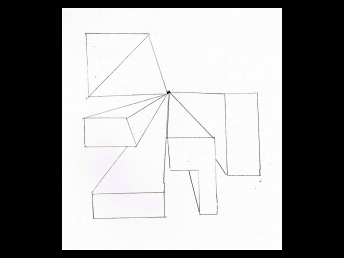
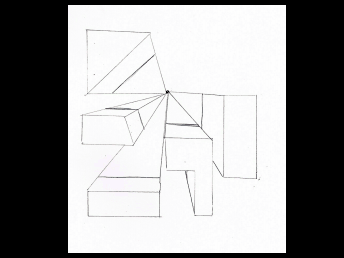
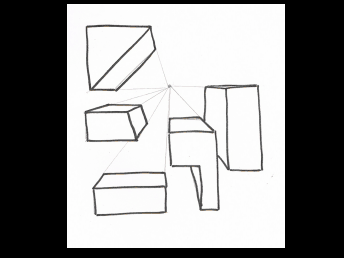
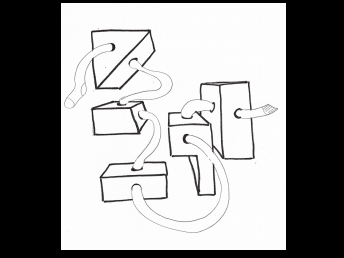
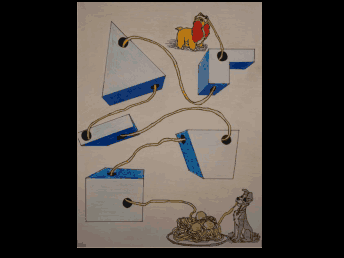
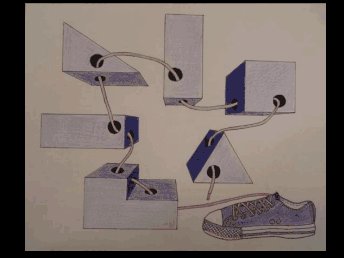
Circle Away Ellipse Assignment
1. Draw at least 5 different/repeated shapes on your paper.
2. Determine and place vanishing point among the shapes.
3. Using a ruler, make straight (orthogonal) lines from the dot to the outside edges of the shapes. Orthogonal lines should be drawn lightly, most of the line will be erased later.
4. Add parallel lines (with a ruler) between the original shape and the vanishing point to close off the shape and make it 3-D.
5. Erase orthogonal lines.
6. Draw circles/ovals on the shapes to create a path for a "line".
7. Add the line/shoe lace/string.
8. More to come regarding color/value/detail!!
**Remember...when dealing with perspective drawing...your ruler will become your FRIEND!!**


Requirements:
- Use a vanishing point to create one point perspective with at least 5 shapes.
- Draw circles/ovals on the shapes to create a path for a "line".
- Incorporate knowledge of value to create depth within the shapes.
- Creatively finish your drawing with color, care and good craft!
- Use a vanishing point to create one point perspective with at least 5 shapes.
- Draw circles/ovals on the shapes to create a path for a "line".
- Incorporate knowledge of value to create depth within the shapes.
- Creatively finish your drawing with color, care and good craft!
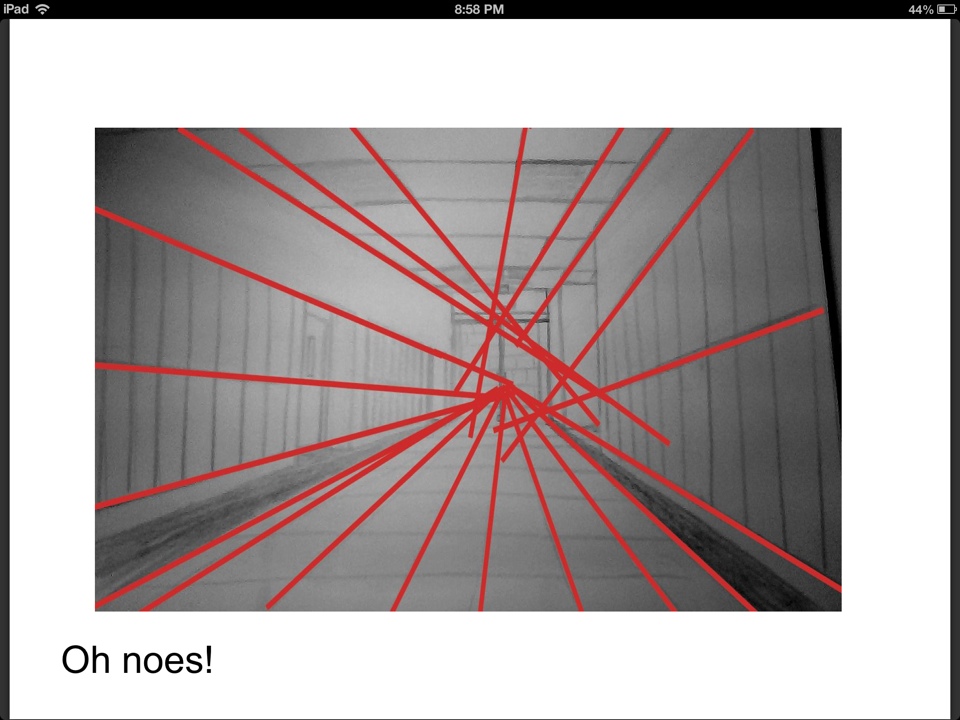
Perspective Assignment- Hallway Drawing
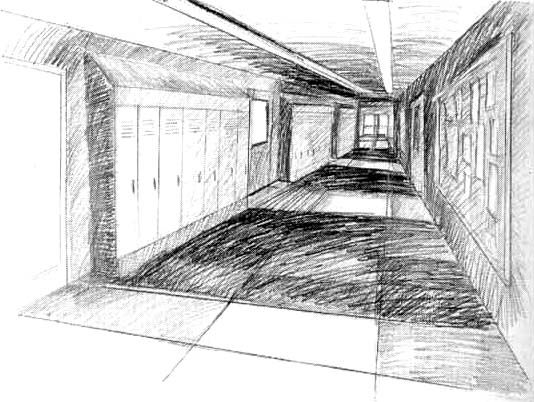
Requirements:
Draw an 8"x11" one-point (or 2 for those of you that need a challenge) linear perspective sketch of a location within the school with as much accuracy as possible. You must use the guidelines given with: A horizon line, vanishing point, and converging lines. Upon approval and proof of understanding, you then may move to your final:
Draw a final one-point perspective drawing (11x17) of a location within the school with as much detail and accuracy as possible. You must use the guidelines given with: A horizon line, vanishing point, and converging lines.
Must be shaded with accurate values (lights and darks)
Have good "craft", meaning take good care of your drawing by avoiding folds, tears, stains, smudges, etc.
Lets get started....
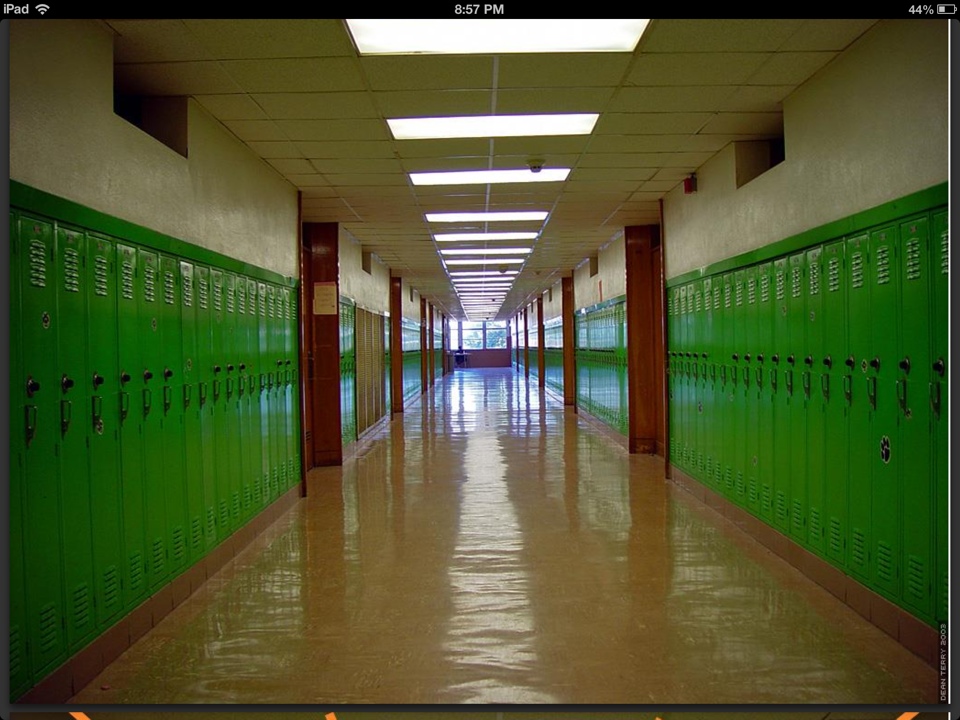
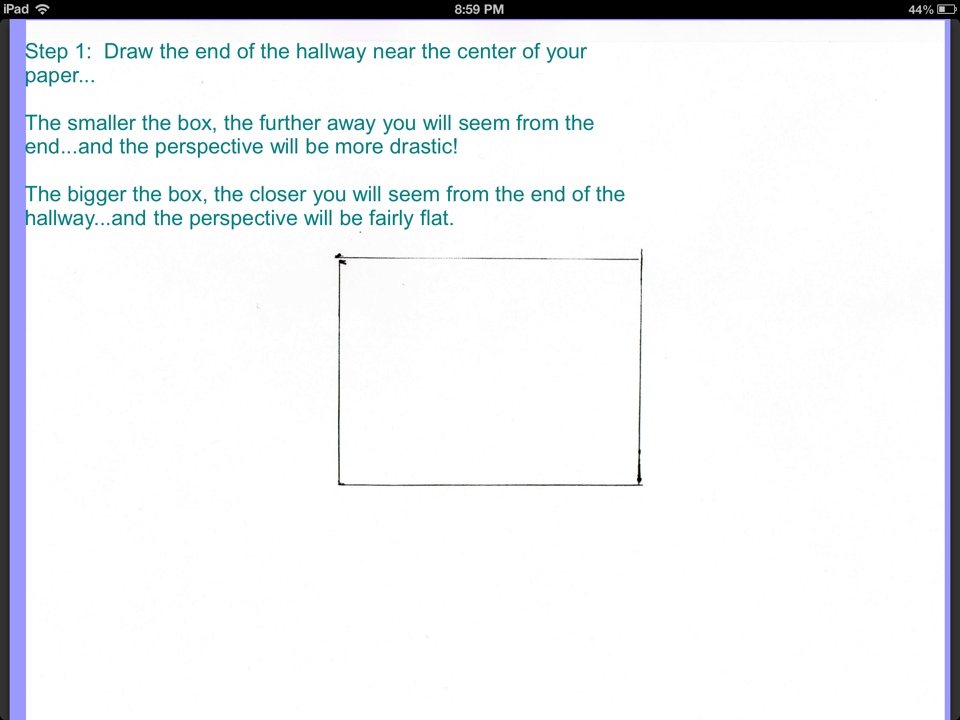
Day 1 (9/19): Sketch the Hallways – Warm-up/Thumbnail Sketch...
Step 1: Get your paper, pencil, eraser, drawing surface, and RULER
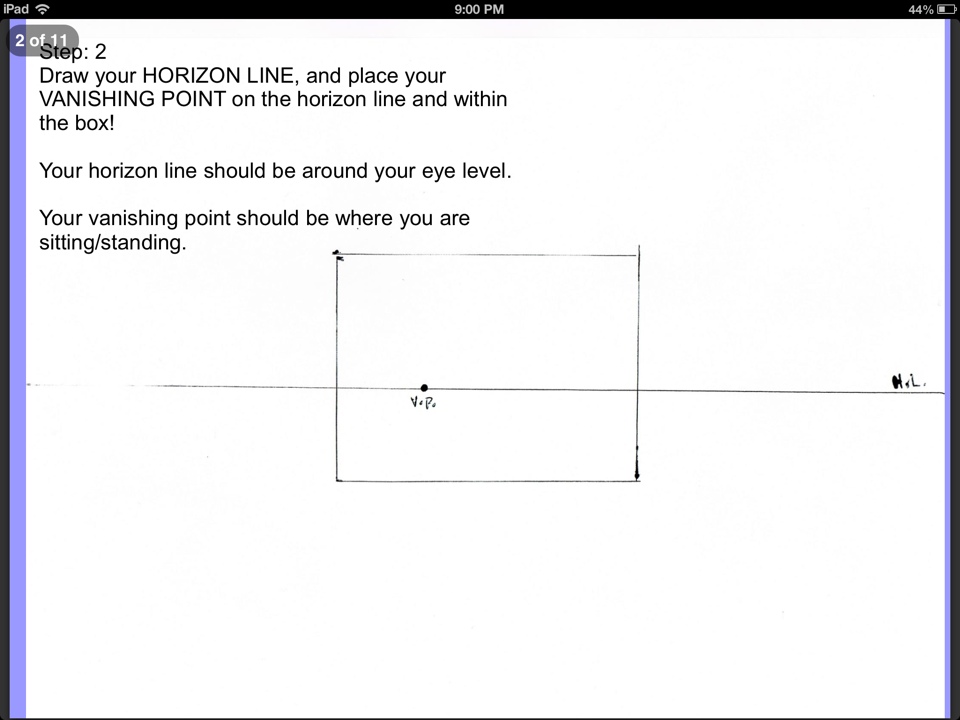
Step 2: Find yourself a location on the second floor of the school with a ONE-POINT PERSPECTIVE. If you are unsure – ask!
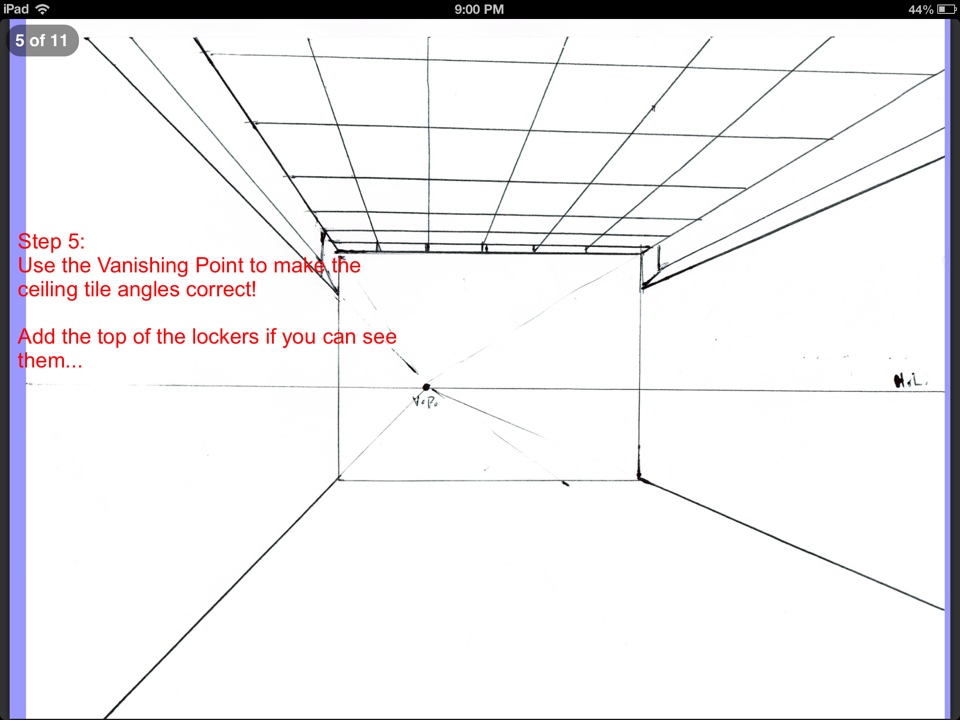
Step 3: Get comfortable and place your HORIZON LINE somewhere near the middle of your page, and find your vanishing point on that horizon line. Commit to This!! Your Horizon Line and Vanishing Point should remain stationary for your whole drawing... It is your “foundation”.
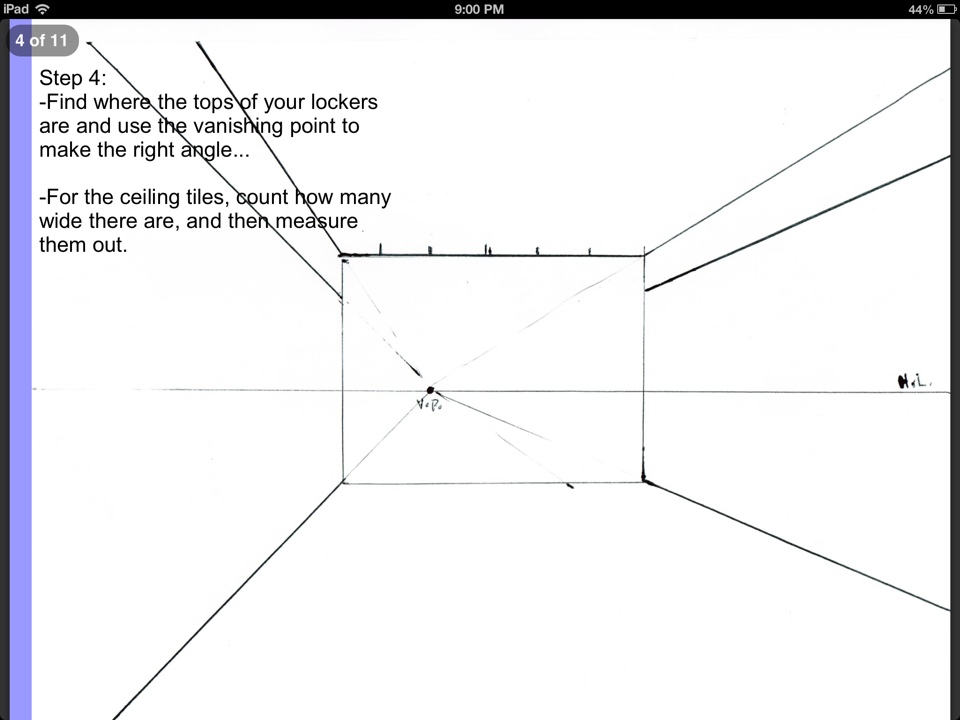
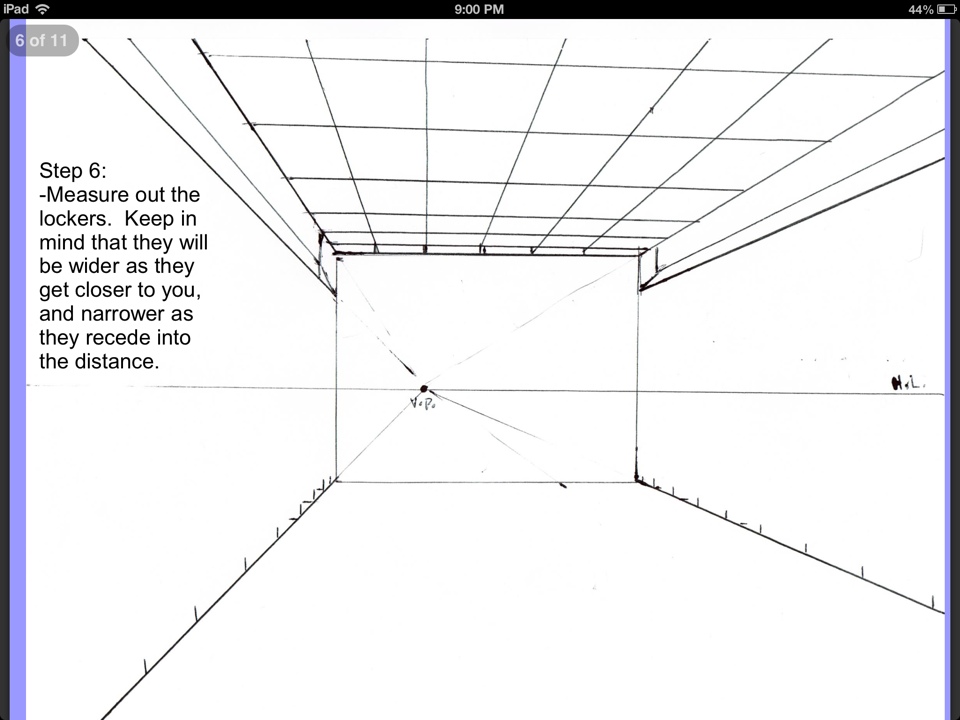
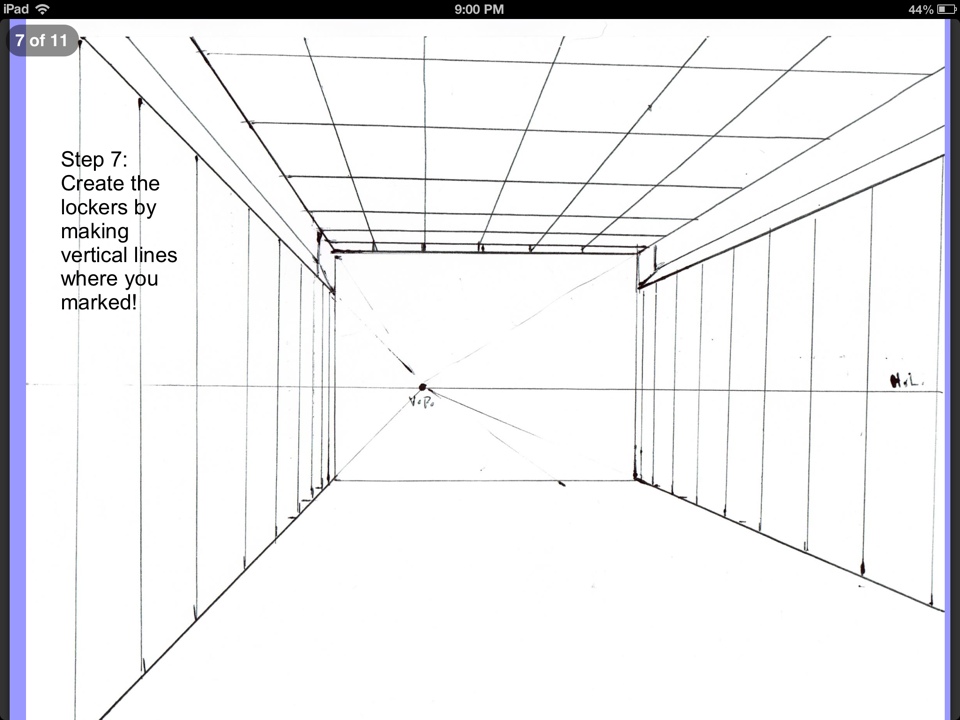
Step 4: Begin drawing your hallway! You may start with the floor or ceiling or even the lockers...
You will need:
-Paper
-Pencil (2H – HB to start → DRAW LIGHTLY!!!!!!)
-Eraser
-Ruler (remember this tool will become your friend)
-Drawing Board
You will:
-Go forth with your items to find a lovely spot in school to draw! Make sure it is a location with (at minimum) one-point perspective!
-Be respectful of my trust by being productive in the halls
-Be respectful of others by being quiet in the halls
Tips:
- DO NOT DRAW DARK! You will probably do some erasing, so keep your marks light! Don't torture your paper!
- Do NOT get hung-up on the details until you are sure you have your “Skeleton” in place...
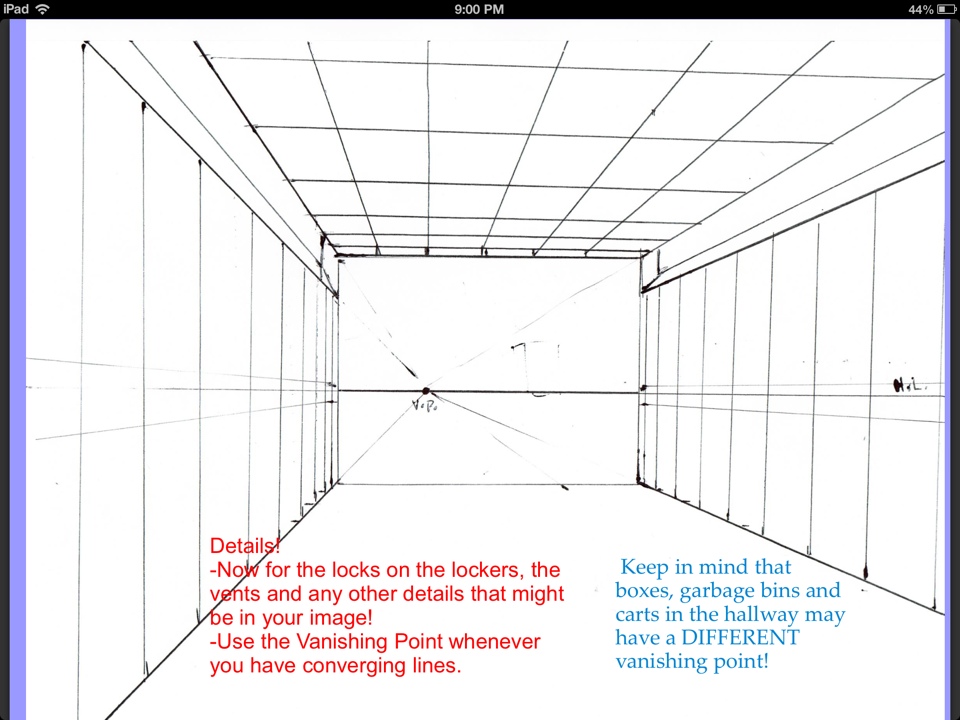
- Cross-check sizes!! Is the garbage bin REALLY taller than the lockers?
- LOOK at what you are drawing! Do not draw from your head! Count how many ceiling tiles wide the hall-way is...etc
Day 1 (9/19): Sketch the Hallways – Warm-up/Thumbnail Sketch...
Step 1: Get your paper, pencil, eraser, drawing surface, and RULER
Step 2: Find yourself a location on the second floor of the school with a ONE-POINT PERSPECTIVE. If you are unsure – ask!
Step 3: Get comfortable and place your HORIZON LINE somewhere near the middle of your page, and find your vanishing point on that horizon line. Commit to This!! Your Horizon Line and Vanishing Point should remain stationary for your whole drawing... It is your “foundation”.
Step 4: Begin drawing your hallway! You may start with the floor or ceiling or even the lockers...
You will need:
-Paper
-Pencil (2H – HB to start → DRAW LIGHTLY!!!!!!)
-Eraser
-Ruler (remember this tool will become your friend)
-Drawing Board
You will:
-Go forth with your items to find a lovely spot in school to draw! Make sure it is a location with (at minimum) one-point perspective!
-Be respectful of my trust by being productive in the halls
-Be respectful of others by being quiet in the halls
Tips:
- DO NOT DRAW DARK! You will probably do some erasing, so keep your marks light! Don't torture your paper!
- Do NOT get hung-up on the details until you are sure you have your “Skeleton” in place...
- Cross-check sizes!! Is the garbage bin REALLY taller than the lockers?
- LOOK at what you are drawing! Do not draw from your head! Count how many ceiling tiles wide the hall-way is...etc


Hallway Etiquette
- Respect the classes/students immediately surrounding your area
- No more than 2-3 students sitting together
- Stay on the second floor (hallway only, no stairs)
- Respect my trust by being productive during class
- Use class time for drawing!
- No more than 2-3 students sitting together
- Stay on the second floor (hallway only, no stairs)
- Respect my trust by being productive during class
- Use class time for drawing!
Rubric Requirements:
- Draw an 8”x11” one-point linear perspective sketch of a location within the school with as much accuracy as possible. You must use the guidelines given with: A horizon line, vanishing point, and converging lines.
- Draw a final one-point perspective drawing of a location within the school with as much realism as possible. You must use the guidelines given with: A horizon line, vanishing point, and converging lines. Must be shaded with accurate values (lights and darks)
- Have good “craft”, meaning take good care of your drawing by avoiding folds, tears, stains, smudges, etc.
Expectations:
- Respect my trust by being productive during class.
- Use class time for drawing!
- Try. Even if your drawing doesn't come out as well as you hoped, if you honestly put in your best effort, your grade will not suffer.
MOVING ON....
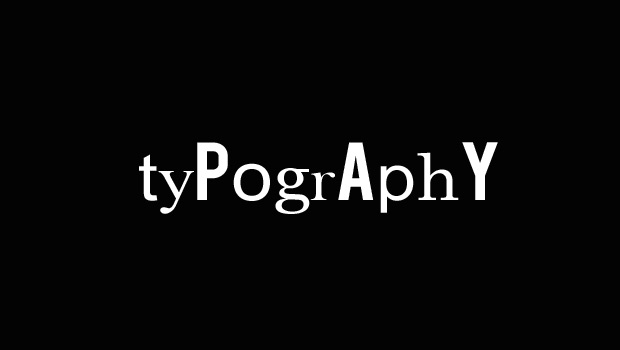
Typography- from the Greek words τύπος (typos) = form and γραφή (graphe) = writing
The art and technique of arranging type in order to make language visible. The arrangement of type involves the selection of typefaces, point size, line length, leading (line spacing), adjusting the spaces between groups of letters (tracking) and adjusting the space between pairs of letters. Type design is a closely related craft, which some consider distinct and others a part of typography; most typographers do not design typefaces, and some type designers do not consider themselves typographers. Modern times, typography has been put into motion—in film, television and online broadcasts—to add emotion to mass communication.
The art and technique of arranging type in order to make language visible. The arrangement of type involves the selection of typefaces, point size, line length, leading (line spacing), adjusting the spaces between groups of letters (tracking) and adjusting the space between pairs of letters. Type design is a closely related craft, which some consider distinct and others a part of typography; most typographers do not design typefaces, and some type designers do not consider themselves typographers. Modern times, typography has been put into motion—in film, television and online broadcasts—to add emotion to mass communication.
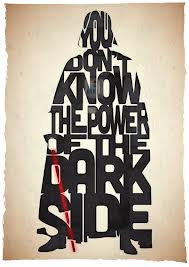
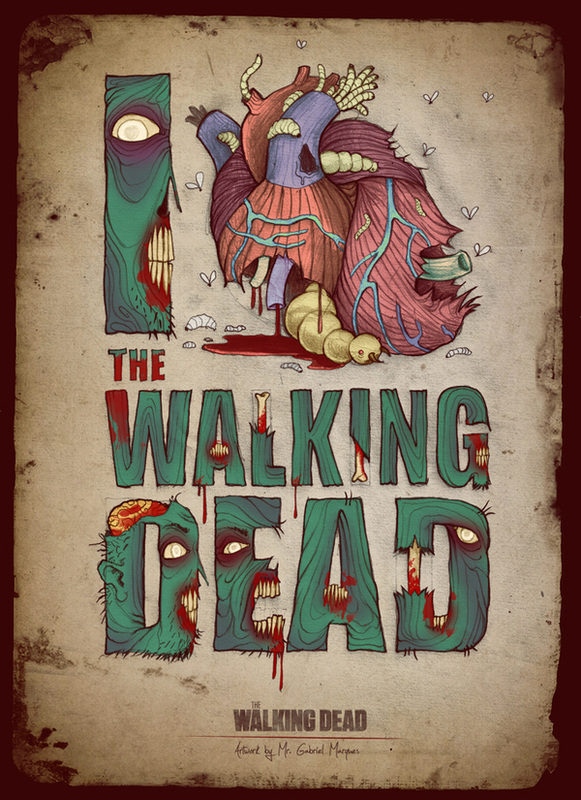
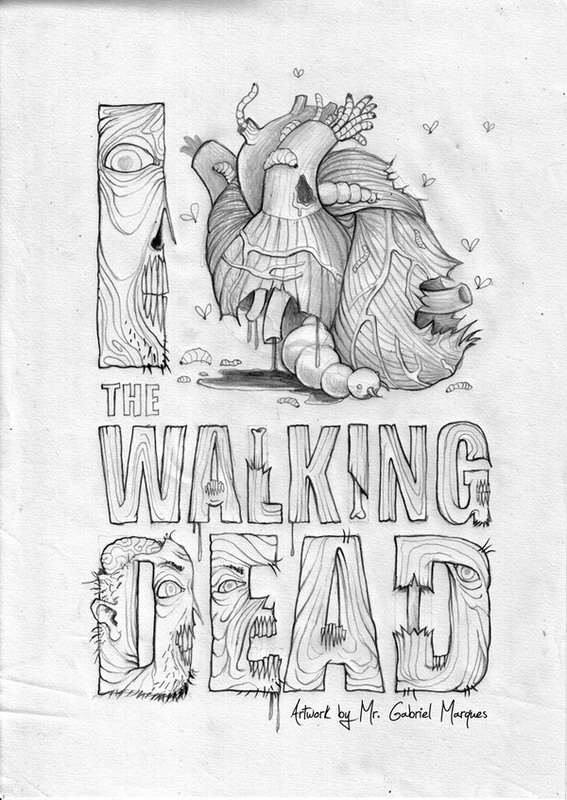


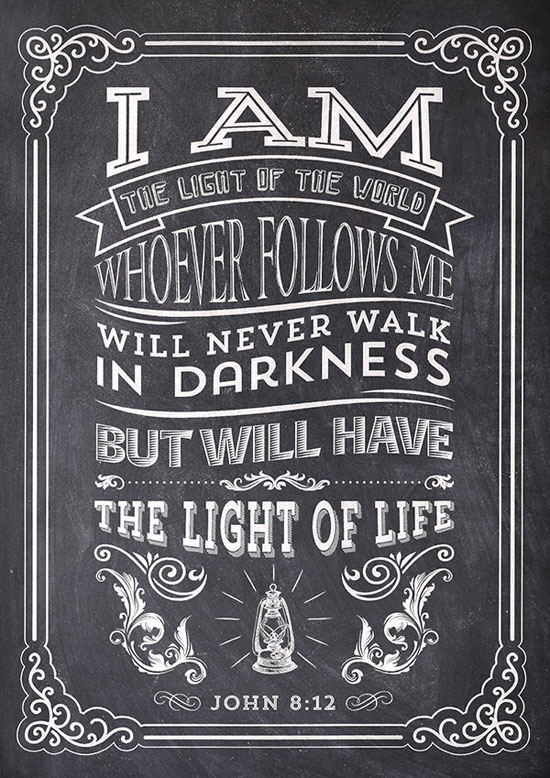
YOUR ASSIGNMENT:
Think of a word or a sentence that has meaning to you...
Creatively DRAW those word(s) in a way that compliments them.
You choose the colors and materials (pen, markers, colored pencil, marker). Strictly using pencil for this assignment will not be allowed (pencil is required for under-drawing, then other medium is to be applied).
Let's get started....
- Research different typography images/posters/ideas
- Brainstorm a concept through sketches (4-5) images
- Determine medium to create artwork
- Approval of sketches prior to starting final image
